Running Oauth2 Manually
Oauth2 is a way for one app to ask for permissions to access another app on behalf of something or someone else.
Here are some examples of apps that might use Oauth2:
- A budgeting app that needs access to my bank account to view my transactions.
- A signature app that needs access to my cloud documents to sign them.
- An app that uses my profile on another site as a way to prove my identity.
That last example is the how the “login with X” buttons work. Those sites don’t actually need extra access to anything besides your user profile information, because going through the Oauth2 process proves you have an account with that site.
Without Oauth2, the only way to do all this would be to share credentials, such as a username and password, with potentially untrustworthy apps.
The rest of this post is going to walk through the Oauth2 protocol “manually”. We will pretend to be a third party “app”, requesting access from the user. For these examples, we will use Github as the service we are requesting access to.
Step 0: Tell The Service About Our App
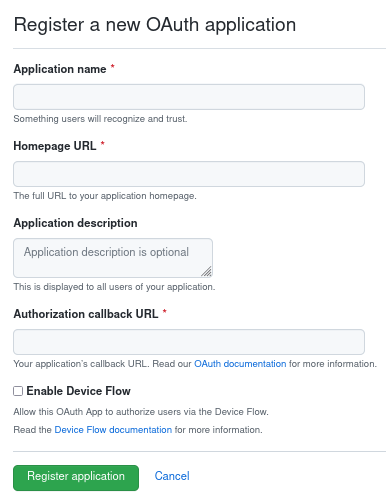
Before we can use Oauth2, we need to tell Github that our app exists. Follow this guide to register a new Oauth2 application with Github. This is what the registration page looks like:

Set the app name and homepage to whatever you want, but set the “Authorization
callback URL” to http://localhost:8080/callback.
After you’ve created the app, make sure to save the client ID and client secret. Github will use these to identify our app.
Step 1: Request Authorization Code
The first thing we need to do is request that the user give us access to their Github resources.
We do this by sending them to a specific URL on Github’s website. Github knows
that requests for that URL are Oauth2 authorization requests. Try entering this
URL into your browser, replacing <your_client_id> with the client ID that you
saved in step 1:
https://github.com/login/oauth/authorize?client_id=<your_client_id>&redirect_uri=http://localhost:8080/callback&state=some_random_string&scope=repo%20gist
After allowing the app to access github, your browser should be redirected to this URL:
http://localhost:8080/callback?code=<authorization_code>&state=some_random_string
Note the we have a code parameter. That’s the authorization code that shows
we have been granted access. The scope parameter we passed in tells Github
what we’re requesting access to.
We’re not done yet. Now we need to use this code to get an access token, which will actually allow us to access Github resources.
Step 2: Get Access Token
The previous step was the last step that involved the user, so we don’t need a
browser for this one. Here I’ve set my client ID to OAUTH2_TEST_CLIENT_ID and
my client secret to OAUTH2_TEST_CLIENT_SECRET in my shell
environment
so I don’t have to copy them when I run this command:
$ curl -X POST "https://github.com/login/oauth/access_token" -d "\
client_id=$OAUTH2_TEST_CLIENT_ID\
&client_secret=$OAUTH2_TEST_CLIENT_SECRET\
&code=<authorization_code>"
If everything works, I get this:
access_token=<token>&scope=gist%2Crepo&token_type=bearer
Step 3: Use The Token
Now we’re done, we have our access token, and we can use it to make requests to the API, with the scopes we requested:
curl -H "Authorization: Bearer <token>" https://api.github.com/user
You can also use it to access protected resources under the scopes you granted, and nothing beyond that.